Kitchen Cabinet Painting

Kitchen Cabinet Painting – The Easy Way to Transform a Drab Room Into a Bold, Bright and Welcome Space

Painting cabinets can be an intimidating DIY project. There’s a lot of conflicting information about the best way to paint them and whether or not the finished result will hold up over time. For a durable finish that will stand up to heavy use, try using an alkyd paint like Sherwin Williams or Valspar. These paints can be mixed in almost any color and require minimal prep.

Preparation

Kitchen Cabinet Painting

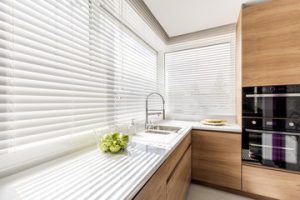
The right Kitchen Cabinet Painting Phoenix can transform your entire space. It can take an otherwise drab room and make it bold, bright and welcoming. However, the task isn’t always as easy as it looks – especially for DIYers. If you’re looking for an easier, faster and more professional way to handle your cabinet painting, it may be worth considering working with a professional service. Professional kitchen cabinet painters are trained to handle the job with the utmost care and attention to detail, saving you time and stress in the process.

Before you can even think of applying any paint, the surface needs to be prepared for its new layer. This will help ensure that the paint adheres well to the existing surface and won’t chip, peel or fade over time. It will also make sure that your finished result is a quality, lasting, beautiful finish.

Start by cleaning all surfaces that will be painted with a degreaser. This will help cut through any grease and grime, ensuring that the paint is able to bond evenly to the surface. Next, lightly sand all surfaces to be painted. Pay special attention to any recessed areas or crevices that will receive the most wear, as these tend to show dirt and dust more than others. Be careful not to sand too much, as this can cause the surface of your cabinets to become dull and shinier, rather than a smooth and glossy finish.

It’s also a good idea to tint your primer, as this will help the finished product match your chosen cabinet color more closely. Many professional cabinet painters will recommend tinting your primer to a shade that is approximately 50% lighter than the final color. This will allow you to achieve a beautiful, even finish with fewer coats of paint.

You’ll want to set up your work area in an area that’s out of the way, but accessible enough for you to move around during the painting process. If possible, a garage or workshop is ideal because it will offer ventilation and keep any fumes from entering your home. You’ll also want to protect your countertops and flooring, as well as any fixed appliances like microwaves or dishwashers. Tape rosin paper or plastic sheeting over them to avoid any accidental spills or drips.

Primer

The primer stage is an essential part of kitchen cabinet painting that helps to ensure your final product looks great. Using the right primer, along with quality cabinet paint and a high-quality finish coat, can transform your old cabinets into a fresh new look that lasts for years to come.

The first step in the priming process is to clean the surfaces of your cabinets thoroughly. Use a degreasing cleaner to remove any grease or oil that has built up over time on the surface of your cabinets. This will help prevent your finished paint job from chipping or cracking over time, and it will also ensure that the new layers of primer and paint adhere properly to the existing surface.

While you are cleaning the surfaces of your cabinets, make sure that you pay special attention to any areas near the stove where grease and food debris tends to build up more frequently. Using an abrasive pad dipped in a degreasing cleaner will work best to get rid of any dirt or grime that is stuck to the surface.

After you are done cleaning the surfaces of your cabinets, it is important to let them dry completely before you start priming and painting. This can take anywhere from one to four hours depending on the weather and temperature. You should not rush this step because a poorly dried primer can cause your final paint job to flake or peel.

The best cabinet primers are tinted to a shade that is approximately 50% lighter than the final color of your cabinet paint. This will provide excellent coverage while still allowing the underlying primer to show through in spots to protect the surface underneath from moisture and heat damage.

There are many different options for cabinet primer, paint and finish coats, so you should spend some time researching which products are the best fit for your project. Be sure to consider factors such as ease of application, odor levels and VOC content when making your decision. For example, N-Hance’s Cabinet and Kitchen Cabinet paints are formulated to resist the effects of cooking oils, moisture, and heat damage, so you can rest assured that your newly painted cabinets will be resistant to chipping and peeling for many years to come.

Paint

Cabinet painting is a way to add value to your home, change the overall look of a room, or refresh existing cabinets. It’s a less costly alternative to replacing the cabinets altogether, and it’s also a lot easier. However, it’s important to understand what makes a good cabinet paint job so that you don’t end up with an imperfect or even worse than old cabinet finish.

First, you’ll want to thoroughly clean your cabinets with a degreaser like TSP. This will remove any grease or oil that has built up and will ensure that the new paint adheres well. Next, you’ll need to patch any holes or imperfections and sand them down if necessary. Once you’ve done this, it’s time to prime. You’ll need to choose a primer specifically designed for cabinetry, such as N-Hance Primer. This is different than most regular latex primers, because it’s engineered to block bleed-through and other possible imperfections.

Another option is to choose a sherwin-williams or valspar cabinet enamel, which are water-based and can be tinted any color you’d like. They require a similar process to the satin enamels, and are more readily available than some of the more premium options.

If you’re feeling overwhelmed by the thought of painting your own kitchen cabinets, it may be best to contact a professional. They can give you a free estimate and teach you what to expect in terms of the cabinet painting process. They can also help you come up with a color scheme that will work for your space and make sure your cabinet painting job comes out amazing. They’ll use paints and materials that are specially formulated for cabinetry, so you can rest assured that your new cabinet finish will stand up to years of wear and tear.

Finish

A good paint job requires time to dry, so be sure you plan enough time for the project. Using a roller for large areas and a brush for details, coat the cabinets with your chosen color. Make sure to follow the manufacturer’s instructions for drying times. After the first coat dries, sand lightly to smooth out any rough spots. If necessary, apply a second coat to achieve full coverage. When you’re ready to reassemble the cabinets, use a labeling system to keep track of where each piece belongs, especially when it comes to hinges, handles, and knobs.

Once the paint dries, you can start putting the finishing touches on your kitchen. This is the perfect opportunity to consider a new look for your cabinetry. If you’re going for a more modern style, you might want to add some glass doors or other accessories. For a more rustic style, you could try adding a distressed finish to the cabinetry by lightly sanding the painted surface after it dries.

There are several different finishes available for cabinetry, and each has its own pros and cons. For example, high-gloss provides a durable finish that is stain resistant and easy to clean. However, it can highlight even minor cosmetic imperfections in the cabinetry. Semi-gloss is more subdued than gloss, but still reflects light and helps colors to appear brighter. This type of finish is also easier to wipe clean than matte or eggshell finishes.

Oil-based alkyd paints provide a durable, long-lasting finish. However, they take longer to dry and can have a strong odor. For a more environmentally friendly option, water-based alkyd or latex paints are available. You can find specially formulated cabinet paint at most hardware stores. Sherwin Williams Emerald line is one of the best choices for cabinetry, as it’s a low-VOC alkyd that’s self-leveling and provides a hard, smooth finish. It’s also available in satin or gloss. Other brands that offer cabinet-specific products include PPG Breakthrough and Ben Moore Command.

Home Improvement

Why Choose Window Blinds?

Window blinds are a classic window treatment option. With their slatted design, they can work with many different styles of decor and provide a great deal of versatility.

Blinds

Choose a slat size appropriate to the window’s width. Larger slat sizes offer less obstruction of the view to outdoors and are best for rooms where you want to preserve a scenic view.

Keeping your home clean is a vital aspect of maintaining a healthy lifestyle. A cluttered space not only creates an unattractive aesthetic, but it also can cause problems such as difficulty in concentrating and stress. The good news is that window blinds are one of the easiest to clean among all window treatments, making this task a breeze.

All you need to do is dust regularly, and the slats will stay free of dirt and grime. The simplest way to do this is by using a vacuum cleaner’s brush attachment or a feather duster, which can remove even the most stubborn of debris.

Another option is to use a solution of water and mild soap to wipe down your blinds, which works well for both wood and vinyl blinds. However, before you go ahead and do this, make sure the cleaning solution is safe for your type of window blinds. Certain chemicals can damage your blinds and leave a residue, so always test the product on an inconspicuous part of the blind first.

Aside from a regular dusting, there are many other ways to keep your blinds in good condition. For example, cellular shades—which are becoming more popular with homeowners—have an added benefit of being easy to maintain and clean. They’re made from a hardy, anti-static fabric that repels dust and makes it easier to wipe away dirt. If you’re considering upgrading your current window blinds, or buying new ones, this is definitely something to consider.

Skylight blinds, on the other hand, require a little bit more work. Typically mounted into the ceiling, you’ll need a ladder or stool in order to reach them to do a thorough cleaning. This isn’t an issue if you opt for a long feather duster, which will allow you to reach even the most difficult to access parts of the blind.

No matter what type of window blinds you have in your home, the key to keeping them looking their best is a consistent cleaning routine. Dusting once a week or two is usually enough, but in case your window blinds are covered with grease or other sticky substances, you can simply wipe them down with a cloth moistened with a little water and soap. Be careful not to get the window blinds too wet, however, as they can warp or crack when exposed to too much moisture.

Blocks the Sun’s Rays

The right window treatments can significantly cut down on harmful UV rays. These rays can damage flooring, furniture, artwork, and other decorative items within the home. Blinds can help protect against them, as they have the ability to absorb or reflect UV radiation. Additionally, they can provide a more precise control over the amount of light that enters a room. Shades can also offer UV protection, but they have the drawback of potentially discoloring over time and may require more manual effort to operate for larger or higher windows.

When selecting UV-blocking window coverings, consider the fabric and opacity of the material. Some fabrics are inherently better at absorbing UV radiation, while others possess special coatings that improve their UV protection capabilities. Additionally, consider a product’s UPF rating, which measures the level of UV protection that it offers.

Generally speaking, blinds are more effective at blocking UV radiation than shades, as their slatted construction provides the most versatility when it comes to controlling light levels and allowing for varying degrees of visibility. They can be angled strategically to diffuse or darken light, and they are typically available in a range of colors and materials that can complement any interior design.

Blinds can offer UV protection while still letting in natural light, which is important for maintaining comfort and boosting a mood. For example, Sheer Window Shadings are a unique hybrid of a shade and a blind, featuring fabric vanes that are encased in an elegant sheer to block sunlight from the inside while allowing it to filter through on the outside. They can be tilted open and closed like blind slats to allow for various lighting conditions throughout the day.

Other window treatment types, such as drapes and roman shades, can also help prevent UV damage to your home. They can be complemented with a blackout lining to fully protect against UV radiation, and they are available in a variety of patterns, colours, and textures that complement any interior design.

Adds Style

Window blinds offer a variety of styles that can match the design of any space. They come in different colors, fabrics and designs that can compliment the interior decor and enhance the beauty of your home. Blinds are also easy to maintain and do not take up wall space like curtains do. They are available in a wide range of options that help to control the amount of light and heat entering a room.

Modern horizontal blinds, also known as Venetian blinds, consist of long hanging slats that are lowered or drawn together by pulling a cord. They are a popular choice for many types of rooms, especially living areas, bedrooms, and dining rooms. They are available in various materials, colors, and styles, including metal, faux wood, and woven wood. Some modern horizontal blinds also come with a built-in blackout liner to provide maximum light filtering and obscurity when needed.

Vertical blinds are another classic window covering that offers a wide variety of colors and designs to suit any style. These are long hanging slats that can be opened in different ways, either by twisting them or using an attached wand to tilt the slats and pull a rod that moves them up or down. They are also available in a wide variety of materials, from flat plastic and fabric to embossed PVC and real wood. They are often paired with a matching valance or cornice to create a sophisticated look that complements the colors and textures of a room.

Both window shades and blinds can add style to a space, but it is important to understand how they each differ in terms of function and appearance. Blinds provide a simple and practical solution to block sightlines while offering control over the amount of light that filters in, while shades give more visual depth with their layered design options and decorative trims.

When choosing the right window treatment, it is essential to consider what each room is used for. For example, a bedroom may require full control of the amount of light that enters at night, in which case a blackout roller shade would be ideal. For more flexible light filtration, you can opt for a lighter roller blind with a sheer fabric layer for daytime use.

Reduces Heat

Window blinds can block out the summer sun’s rays and help keep heat inside during colder weather. This ability to control airflow helps save on energy costs and can also prevent the sun from fading and deteriorating fabrics, carpets and hardwood floors.

They’re also a great way to keep sunlight out of dark rooms where it can cause eye strain, especially for children. Unlike curtains, they feature individual horizontal slats that you can easily adjust to your liking, making them more versatile when it comes to light and privacy control. Blinds come in a variety of materials, colors and styles, allowing you to choose the perfect window covering for your space.

Curtains and drapes are another excellent option for reducing solar heat gain, but they require more care to maintain. These window treatments are often subject to harsh weather conditions, and they can easily get soiled by dust or pet hair. Fortunately, they can also be made more eco-friendly by using an energy-efficient material such as woven cotton or repurposed fabric.

Draperies that are medium to light in color can reduce interior heat gain by up to 33 percent, according to the DOE. These types of window treatments typically feature white plastic backings that reflect sunlight, rather than absorbing it and absorbing its heat. They can be layered with blackout draperies to further improve thermal efficiency.

In addition, insulated cellular shades can reduce heat loss by up to 60 percent and are an excellent choice for helping regulate indoor temperatures in winter. These window treatments are usually thicker than traditional blinds and are installed with a tight fit to ensure they’re more effective at keeping the heat in.

If you want to save even more time and effort, consider getting motorized slats that operate on a track system and can be opened or closed at the push of a button. They can be scheduled to open and close at specific times to help improve energy efficiency, or you can pair them with home automation solutions to control them from a smartphone app or through your voice.