Maintaining a vehicle’s paint can significantly increase its resale value and appearance. It protects your investment, warding off future damage and allowing for easier maintenance.
Auto Paint Restoration involves a meticulous process of cleaning and polishing with specialized tools to remove surface imperfections like scratches, oxidation, etching, water marks, etc. The end result is a smooth finish with vibrant colors that look brand new. Keep reading the article below to learn more about Auto Paint Restoration.
As any car enthusiast knows, a well-maintained paint job is not only important for enhancing the appearance of your vehicle but also helps keep it safe from harm. Damaged and faded car paint not only looks unattractive, but it can expose the metal body to rust and corrosion over time. Restoring your car’s paint is a cost-effective and much safer alternative to repainting the entire vehicle. However, this process requires a lot of skill and expertise to get it right.
The first step in this process is to thoroughly clean the surface of your vehicle. This includes a thorough washing to remove dirt and grime, along with a degreaser to remove any oil or wax residue that may have built up on the body. This step will help ensure that you are working with a clean canvas and will provide optimal results for the rest of your restoration project.
Once the surface has been cleaned, it is important to mask off any areas you don’t want to be repainted. This will help protect your valuable drivetrain components from overspray and paint bleed. A combination of 18-inch masking tape and paper will work best to cover any exposed wiring, exhaust pipes, or other parts of the vehicle that should remain untouched.
Next, you will need to prepare the surface of your vehicle for the buffing and polishing steps. This involves removing any dirt or debris that has collected on the surface, as well as any contaminants such as bugs or tree sap. Then, you will need to apply a wax sealant to your vehicle to protect it from future contamination.
After you have completed the prepping stage, it is time to begin the actual paint correction process. This is a lengthy process that requires a high level of skill and expertise to get the best results. It is also a good idea to hire a professional to perform this service, as they will have the necessary tools and equipment to get your car’s paint looking like new again.
If you are on a tight budget but still want to restore your car’s paint, consider using a product like ceramic coating instead of full paint correction. This will give your vehicle a glossy, protective layer that will repel water and UV rays, keeping it looking shiny and new for a longer period of time.
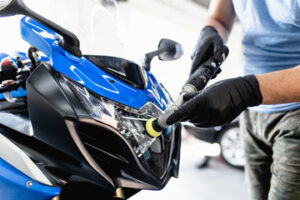
Buffing
The buffing phase of auto paint restoration involves eliminating swirl marks, deep scratches and other imperfections from the paint surface using a machine polisher. This process can be simple with a single stage treatment, or it may require multiple stages to achieve optimum results. The most important thing is to use a quality buffer and the appropriate pads to avoid damage to the paint surface.
In addition, it is crucial to follow the manufacturer’s recommendations regarding buffer RPM speeds and to be careful when working near edges or body lines. The buffing process can also open the microscopic pores in the paint surface, so it is essential to seal the surface with a good wax or ceramic coating afterward.
This method works great for old, oxidized single-stage non metallic paints and can make a drastic improvement in appearance as well as protect the paint from future damage. However, it is essential to note that this technique is not a solution for severely faded or heavily oxidized paints (the point of no return). If the paint has reached this level of degradation, a repaint will be required.
Faded clearcoat can often be restored, but it is not always possible to bring back the original luster of the paint. This is especially true for older cars that have been left outside in harsh conditions for extended periods of time. Regular maintenance practices and avoiding direct sunlight can help prevent future clearcoat fading, but it is often unavoidable.
A professionally applied ceramic coating can help to protect and enhance the finish of a vehicle. This is a newer technology that offers long-lasting protection against UV rays, scratches and other environmental contaminants. However, it is expensive and requires a professional application to ensure optimal results.
If you are interested in restoring your car’s paint to its former glory, it is worth seeking out an automotive detailer or body shop that specializes in this type of work. These professionals will be able to provide you with the best options for a cost-effective, high-quality finish that will keep your car looking great for years to come.
Polishing
The polishing phase of car paint restoration eliminates minor scratches and dullness, and also helps to reestablish the clear coat. The process involves washing and clay barging the vehicle to remove embedded dirt, then buffing with the appropriate compounds and pads to restore shine and clarity. It’s important to use a light touch and work in small sections so as not to overheat the surface. This can be done by hand or with a machine.
In some cases, the clearcoat may be too faded for this to work, in which case repainting is needed. A faded or damaged paint job can significantly reduce a vehicle’s resale value, which is why it’s essential to keep up with regular maintenance and proper protection.
If your car is suffering from oxidation, the most effective way to address this is to polish it out and seal with a high-quality wax. This will restore the clearcoat and help to prevent future oxidation.
This is a crucial step in the auto detailing process, and can make the world of difference to your car’s appearance. The goal is to remove all of the oxidation and create a smooth, shiny surface that will look like new. This is a time-consuming task, but one that can be completed with the right products and techniques.
There are a number of types of paint defects that can be corrected with polishing, including spider web swirls, micro marring, buffer trails, holograms, bird droppings, acid etchings, water spots and more. Using a polish with a nap, such as the highly-effective #7 Show Car Glaze, can help to soften the effects of these issues.
Using a polish with a mild abrasive can also help to remove deep scratches and blemishes, although these will not be eliminated as completely as they would be with a full-scale car paint correction treatment. For those looking to enhance the look of their vehicle without going through a full paint correction, there is a technique known as paint augmentation which uses all in one products to disguise scratches and soften swirl marks.
Waxing
After the paint correction process is complete, a quality wax or ceramic coating should be applied to protect the freshly restored surface. This layer of protection will shield the paint from environmental contaminants, acidic bugs, water spots and light scratches that can occur during regular washing. A good wax will also help to reduce oxidation and fading, ensuring that the vehicle maintains its depth, shine and glossiness for as long as possible.
The process of restoring faded car paint requires several stages including washing, decontamination, buffing, polishing and waxing. Each step is crucial and must be performed with proper technique, precision and care. This is especially true during the washing and decontamination phases when dirt particles that may interfere with the corrective process must be removed from the surface of your vehicle.
This is a very delicate process and should only be done by experienced, trained professionals. During this phase, your vehicle is washed and thoroughly decontaminated using a specialist clay bar to remove embedded dirt particles from the paint surface. This process will prevent additional damage and enhance the effectiveness of the next steps.
During the buffing stage, a light abrasive compound or polish is used to remove surface imperfections such as light swirl marks, water spots, and oxidation. The goal is to achieve a smooth, even finish that reflects light beautifully. This is an important step to take if you want to restore your car’s appearance and increase its resale value.
The polishing stage is a final step in the restoration process that involves using a soft polishing pad and a less-abrasive polishing compound to refine the surface of your car’s paint. The goal is to create a smooth, even surface that is free of imperfections and swirl marks. This process will also help to eliminate any haze or buffer marks left by the previous stages of the polishing process.
After the polishing phase is completed, a high-quality wax or ceramic coating should be applied to the paintwork to protect it from environmental contaminants and the elements. This is a great way to extend the life of your paint work and keep it looking shiny and new. A high-quality wax or ceramic coating will also help to repel water and oil stains, making it easier for you to clean your vehicle.